
February first Alex Simons from Microsoft announced “Print to corporate printers from Azure AD joined Windows 10 devices! in this article. It finally allows your users to print directly to your corporate computers from your Azure AD joined computers”. But with this solution, you still need at least one print server in your on-premises network and we want to get rid off as much on-premises servers as possible and don`t want to keep a print server.
About a year ago I was already searching for a solution to fully manage printers from the cloud, so we can shutdown the on-premises print servers. At that time I tested Printix and wrote an article about this product. Because cloud managed printing is in the spotlights again since the announcement of Alex Simons and I have no idea why the old article was deleted, let`s have a look again at the Printix solution.
![]()
Printix provides a fully cloud based print management solution, without the need for a print server. In short you just have to register an account, download and install a small Printix client on a computer which is always online and on the same network as your printers and you`re good to go. Printix provides a ‘standard’ print solution, but also a ‘follow me’ print solution and you`re able to print to the office printer from your home address. There are several authentication methods for your users, like Active Directory, Google and off-course Azure Active Directory.
Because this is a cloud print solution and we want to shutdown all on-premises servers, I will only focus on connecting Printix to Azure AD.
Initial setup Printix
The first thing we have to do is start a trial on the Printix website. I registered with my work email, but when using Office 365 you could register with that email address.

You will receive an verification email. After verification you are asked to download and install the Printix client. Install the client on a computer which is on the same network as the printers and is always turned on.

The installation is just clicking a few times next and that`s is. When the installation is finished you see the Printix icon in the taskbar on the right. Click on it and choose Sign in.

After you are signed in, switch over to the Printix portal. You see a discovery is performed searching for printers on the network your computer is connected to (it will also find printers not installed on the client computer). After the discovery is completed, the initial setup is completed. You are now able to use Printix cloud management.

Connect Printix to Azure Active Directory
After the previous setup is completed, you are able to deploy the Printix client and let your users sign in with accounts you assign to them, but this creates a new account with a new username and password for your users which they need to remember. You are able to provide your Office 365/ Azure users a better user experience when you connect your Printix environment with your Azure AD. This allows your users to sign in with already existing credentials and provide your users a Single Sign On experience.
From the Printix Dashboard, click on the menu button on the right. From that menu you are able to access the Network, Printer and Print queues and settings like Authentication. We need to open Authentication to setup the connection between Printix and Azure AD.

Check the box Enable Azure authentication en click Connect.

You need to provide your Azure AD credentials to sign in, after authenticating you are asked to accept the permissions requested by Printix.
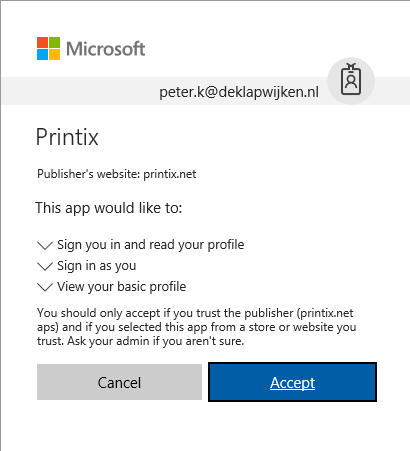
The connection is setup between Printix and Azure AD. Now click on Accept for all users, to grant permissions to Printix to read user profiles. You need to provide Office 365 admin credentials for this step.
You are also able to sync Azure AD Security groups to Printix, which you can assign to printers/ print queues in Printix. Only groups which contain Printix enabled users are synced to Printix. To sync your groups, click Synchronize groups, provide your credentials again and accept the requested permissions.

After performing these steps, Single Sign On is setup (and optional your groups are synced to Printix).
Deploy the Printix client with Microsoft Intune
We need to deploy the Printix client to our computers and because we are focused on management from the cloud, there is no doubt we will use Microsoft Intune for this job. From the Printix portal go to Settings and download the msi installer file for Windows.
Logon to the Azure portal and open the Intune dashboard. Browse to Mobile apps, Apps and choose Add. As App type select Line-of-business app. Next click app package file and upload the msi file.
Click App information and fill in a Name, Description and optional the other requested information. In the command-line arguments field you need to fill in: WRAPPED_ARGUMENTS=/id:cbfce0b5-da3a-4cb6-b8f7-a04ee31ddd90
The ID is just an example. You can find your ID in the name ofthe msi file you downloaded.

After the app is added to Intune, assign it to a group of your choice. I assign it as required to a user group, but you are also able to assign in to all users or devices.
When switching over to an Azure AD joined/ Intune managed device and performing an Intune sync the Printix client is installed, and because Single Sing On is enabled the user is automatically singed on to Printix after a few minutes.

Printix additional settings
From the Printix Dashboard you can open all the additional settings tabs. Here you see Network, Printers, Print queues, Users and Computers in the top menu. On the Network dashboard you find all discovered networks. When a network is discovered via a Printix client, its is marked as Unknown. Your are able to assign this unknown network to an existing known network or create a new network. Multiple networks (called Gateways) can be assigned to one known network.

On the Printer dashboard you find all discovered printers. From here you can set additional printer settings, see the print queues, diagnostics and history.

You are able to create several print queues for a printer, with different settings as you can see below. From here you assign security groups to a queue to control which users have access to the print queue (when no group is assigned all users have access to the print queue). You can select the preferred print driver (a lot of drivers are already present, but you are able to upload your own driver) and see on which computer the print queue is added.

I think it`s clear what you can manage from the user and computer dashboard, let`s have a look at the user experience.
Printix user experience
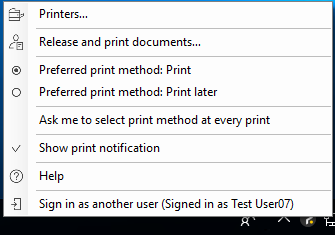
When we click on the Printix icon on the taskbar we see several options.
Click on Printers to see (or search for) the Printix managed printers you have access to.
Release and print documents opens a browser, from which you can see the pending documents.
Below that you can choose the preferred print method.
After you selected Printers a new windows opens. Automatically added printers on which you have access rights are shown here and you are able to search printers. Select a printer, click Add and the printer and driver are installed an ready for use like a on-premises managed printer.

You have three options when printing a document; Print, Print later and you can print to the Printix Anywhere printer.
When you select Print, your document is printed directly to your printer of choice.
When you select Print later, your document is assigned to the printer of choice and queued. You need to manually release the print job by visiting the Printix portal. This can be done from a tablet, smartphone or via your computer browser by selecting Release and print documents. Print later provides a secure print solution.
The third option is print to the Printix Anywhere printer. Now your job is queued and available to release from the Printix portal. From the Printix portal select your document and select the printer closest near you to release the document. This print method is like a follow me print solution.

Every printer managed by Printix is assigned a unique ID. This ID can be printed as a QR Code and mounted to the printer. This allows the user to identify the physical printer. When you scan the QR code with a mobile device, it opens the browser and allows you to release the document, like you can do on your computer when choosing Release and print documents.

When you are looking for a cloud only print management solution Printix is a very fine option. The integration with Azure works fine, users are automatically signed in without any issues and don`t even notice Printix is a separate solution not part of your Azure AD. For the user it`s very easy to install the printer (and driver) from the list of assigned printers. Discovery of printers on your networks is just a click on a button and printers are ready for use after it the are discovered. The only option some companies might be missing is the control of the paper trays, but do we still want to set every setting possible on a printer?
Update March 16th: Print queue configuration
Some of the Printix employees pointed me at this option, print driver configurations. In my conclusion I described a feature some companies might be missing, the control of the paper trays, but with this option you are able to control the paper trays. Let`s have a look how to use the print driver configurations to control the paper trays.
Open the properties of the printer you want to create a new print queue for and choose Create print queue. Give it a name and click Confirm.

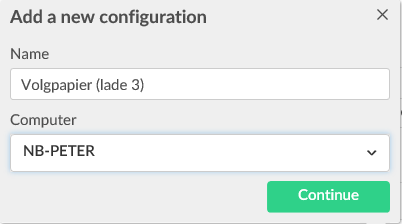
Open the properties of the print queue and switch to the drivers page. Click on Add a new configuration, give it a name an choose an online computer on which you can setup the printer properties and preferences.
In a few seconds a screen like below shows up on the computer informing you about a temporary printer is installed on the computer.

Open the preferences of the temporary printer, set your input tray (and other settings you like to control) and click OK.

After clicking OK the temporary printer is removed and the configuration is saved.

Switch over to the Printix dashboard. The configuration is saved. Don`t forget to save the configuration from the settings page and the print queue is ready for deployment!
