Since about a week Data Loss Prevention (DLP) is available in Microsoft Teams, for chat and channel messages. Data Loss Prevention in Teams will enable you to identify, monitor, and automatically protect sensitive information. With DLP we can create policies to prevent sensitive information (like credit card numbers, social security numbers, or health records) from being shared or leaking unintentionally. Policies will apply to both messages shared in private chat and channel conversations as stated in this article.
DLP policies were already available for documents saved in Teams which are stored in a SharePoint library, this is now expanded to the chat and channel messages.
In this article I setup Data Loss Prevention for internal sharing because of the easy testing with internal users, but probably in a production environment you will set this up to prevent sharing sensitive information with external users.
I want the users get notified when a low value of sensitive information is shared, but dont want to block sharing this.
I want to block sharing a high volume of sensitive information. In this case the low value is set to one and everything above is counted as high volume.
Setup a Data Loss Prevention Policy
Data Loss Prevention Policies are created from the Security and Compliance Center.
- Open the Security and Compliance Center – click Data loss prevention – Policy
- Click Create a policy
We have the option to choose a DLP Policy template with pre-configured settings or create a custom policy. In this example I will test the policy using credit card numbers, so I choose Financial, US Financial Data and click Next.
- Give your DLP Policy a Name
- Fill in a description (Optional)
- Click Next
On the next tab we need to choose the locations on which the DLP policy is applied. Choose Let me choose specific locations if you only want the policy to apply to Microsoft Teams and click Next.
If you choose the default option, the policy is applied to Exchange, Teams, SharePoint and OneDrive.
Click Next.
- Switch off all locations except Teams
- Click Next
By default the policy is applied to all Teams accounts (private channels and Team channels), if needed you can choose the accounts yourself or exclude accounts.
- Check Use advanced settings
- Click Next
The DLP policy contains two rules, one for low volume of content detected and one for high volume. A rule contains conditions and actions that define the protection requirements. You can edit all conditions and actions.
Click Edit rule under Low volume to edit the low volume of content detected rule.
The first thing we can edit is sensitive info type. By default the instance count in the low content rule is set from 1 to 9, for testing I changed them to 1 (min) and 1 (max).
Under Content is shared, I set only with people inside my organization for testing. You probably leave this option set to with people outside my organization if you want to prevent sharing sensitive content with external users.
If we scroll further down we see no actions are taken for low content detected (the content is not blocked), but user notifications are show in the chat client.
Scroll down and click Save.
We also need to edit the high volume of content detected rule. Because I set the instance count in the low content volume rule to 1, I need to set the minimum instance count in this rule to two, or we create a gap in the instance count.
Again for testing I set Content is shared to people inside my organization for testing.
For the high content rule an action is set to block sharing and access to sensitive content. I set the option to Everyone for testing only.
This action needs to be set to actively block sharing sensitive information (credit card numbers in my case) in the Teams chat and private channels.
If we scroll to the bottom of the rule we have the option to allow users to override the policy and share content (but require business justification to override) and we have options to send incident reports to administrators. I leave this default.
Save this rule to return to the Policy settings tab and click Next.
Check Yes if you want to start using the policy, but maybe it`s a better idea to first test the DLP policy so users can get familiar with DLP.
Check the option of your choice and click Next.
Review the settings and when everything is fine click Create.
At my testing it took some time before the DLP policy was active in Teams.
End-user experience
It`s time to have a look at the user experience.
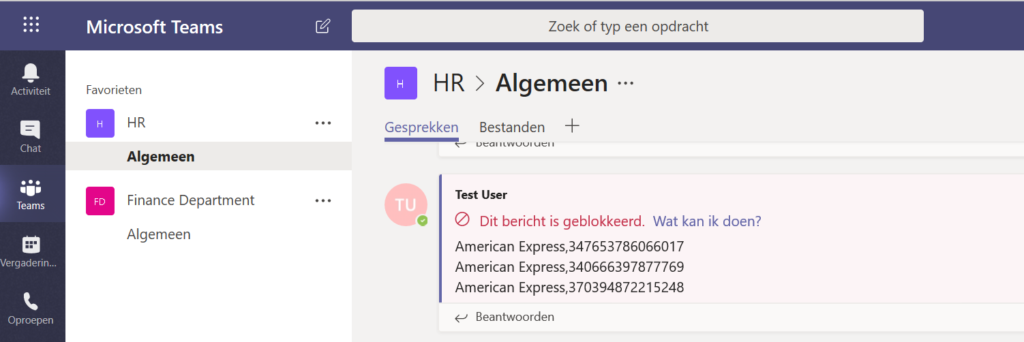
Open the Teams app and try to send some sensitive information. In my example I tried to share multiple credit card numbers in the HR channel, which are immediately blocked with below message (sorry the printscreen is in Dutch).
At the side of the other users in the channel who should have previously received the message with the credit card numbers, the message is blocked.
If I only share one credit card number in a message, the message is not blocked, but only marked in Teams. The other users in the channel see the normal message.
Depending on the reports settings you set, the user and/ or administrators receives an email report when sensitive information is shared using Teams.
When working with external (guest) users in Teams, DLP in Teams chat and channels is a good extension of the capabilities we already had with DLP to keep sensitive data secure.
Unfortunately at this moment it isn`t working as stable as expected. I see not always the creditcard numbers are recognized, so I hope this gets some improvement in the next weeks.

